Oh, granite – what else is there to say? This beautiful stone has been part of many homeowners’ lives during the last century and for a good reason. In truth, we can mention several reasons, but if you’re here you probably know most of them and are ready to begin the installation of your piece.
Well, keep reading this complete, step-by-step guide on granite countertop installation to find out! With enough patience and the right tools, you can have great results.
Read as well: Granite Countertops: The Definitive Guide
Necessary tools before you begin
We’ve separated below a list of tools, products and equipment you’ll need to do this job. Keep in mind that most of these things you can find for sale or rental in construction stores, so the budget you would spend on an installation crew is probably going to be used here.
- seam setter
- 4’ level
- angle grinder with diamond blade
- caulk gun
- acrylic caulk
- shims
- painter’s tape
- measuring tape
- two-part epoxy for non-porous applications
- proper protective equipment
- utility knife
- jab saw
- pencil
- soft cloth
- granite cleaner
- granite sealer
A cardboard or similar material for a template is recommended, too, although optional. By the way, even though you’re here as to not contract further services, it’s crucial that you work closely with a stone fabrication company in regards to the cutting techniques and delivery options. This is a job that needs accuracy in every step towards the final result, so expect a professional to pay you a visit for a general checkup. You know, to see if there are any wall bumps or exposed pipes that might make the installation difficult.
Granite countertop installation: step by step
Once you have your mind set on the kind of granite you want, it’s time to bring it into your house. You’ll encounter several samples of colors, textures and edges depending on the store that you choose, which is a versatility granted by this marvelous stone. Additionally, details such as the length of the overhang and backsplash are cause for concern as well.
Time to begin your granite countertop installation!
- Measuring every inch: Whether you’re building a new house from scratch or simply doing a renewal, it’s important that you remove existing countertops and old cabinetry. After that, precisely measure the tops of the base cabinets by the distance from the wall to the fronts, considering its whole width. Hand this information to your fabricator along with the other characteristics gathered – such as sinkholes, cooktop areas and soap dispensers.
The template can come in handy here. Be it cardboard or plywood, use a scribing tool in order to snugly fit it against the wall along the entire run of cabinets, tracing the front edge along the way. Be careful not to allow a span of more than 2 feet between cabinets. Likewise, avoid leaving more than 6 inches of unsupported overhang with 2-centimeter granite and 9 inches with 3-centimeter granite.
- Getting the transportation right: Like we said before, in case you don’t want a delivery you’ll have to go get your stone at the store. To safely bring it home, make sure to carry it in a vertical position so it doesn’t break. Clear out a space in the designated area, where you’ll drop the slabs; use the painter’s tape to cover the edges for extra protection.
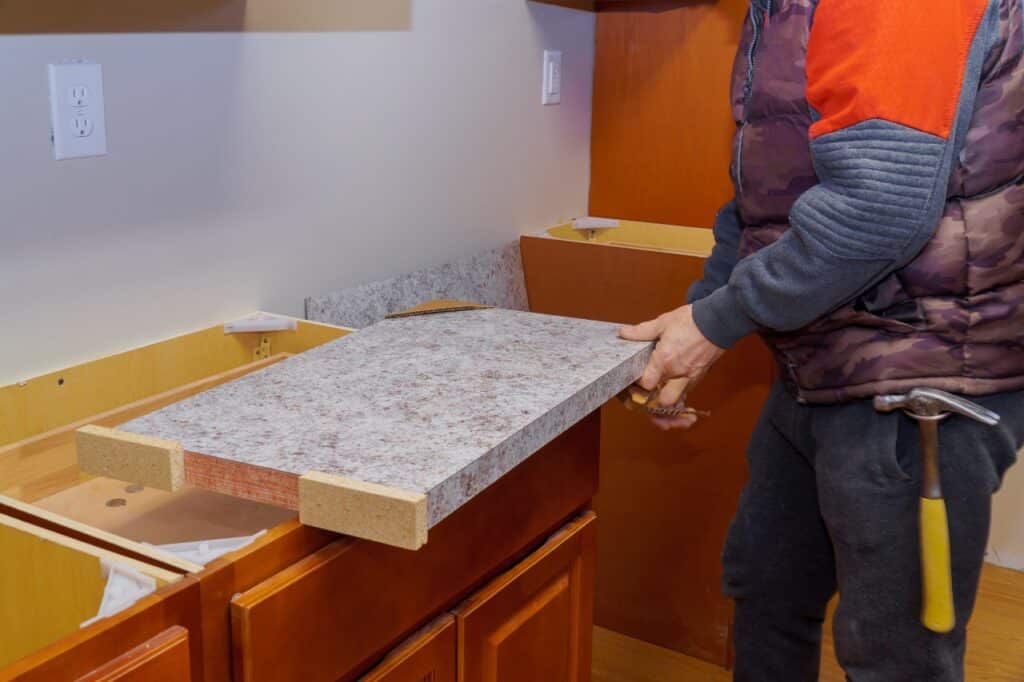
- Installing the granite slabs: First and foremost, double-check all the necessary tools and dry-fit the countertop to ensure an accurate fit. Lay the stone directly upon the frames of the lower cabinets. The edges must, by any means, fit snugly and securely, including the seams between each one. If somehow it’s loose, you can either use a utility knife and jab saw to recess the drywall or shave the edge of the stone itself to the desired dimensions with a diamond blade.
Of course, these are both meticulous actions that can damage your eyes and mouth if you don’t wear protective gear.
- Joining the seams: This step is for projects with multiple slabs that need to be connected. In other words, most American kitchens. For that, reuse the painter’s tape on each side of the seams for minimal mess. By mixing the respective two-part epoxy, you’ll have to join the butt seams and pull them together with the seam setter. The latter must be placed about 1-½ inches from the seam. Apply the epoxy, remove the tape and begin tightening the screws until there’s resistance – then attach and turn on the auto pumps.
After the epoxy is set, carefully take out the setter and shave away the excess of product with a single-edge razor. Try to hold it as flat and straight as possible to prevent gouging the surface.
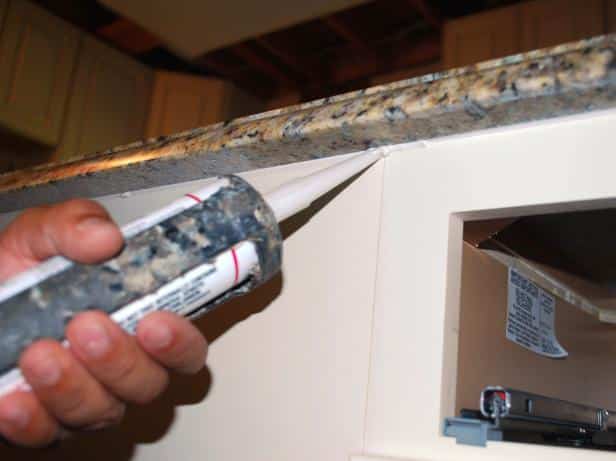
- Attaching the cabinets: Now that the countertop itself is in the right spot, it’s time to glue it to the cabinetry. Even though its sheer weight is enough to hold it against the woodcraft, it’s recommended to run a bead of caulk along the underside perimeter where both ends meet. Remember to always use acrylic, for silicone can cause staining.
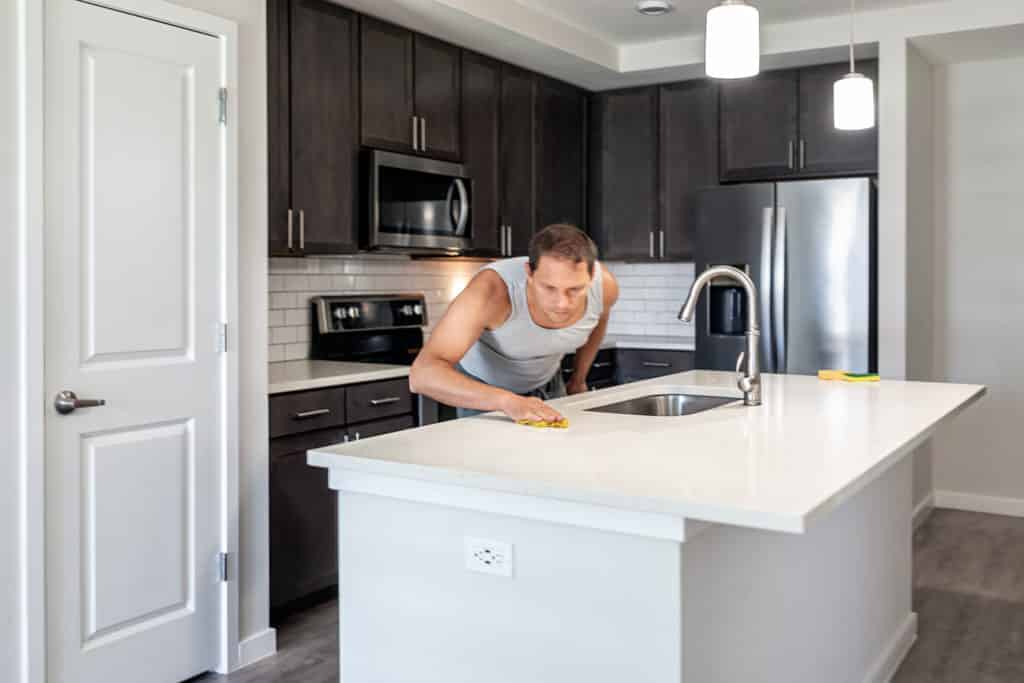
- Cleaning and sealing your granite: When all is said and done, you should maintain your new countertop with a nice cleaning solution and apply a sealer onto it. Sealing your granite countertop – click here to read everything about this process – is something essential to prolong its lifetime. Not only does it protect the stone from scratches and stains, but it also enhances the brightness we expect from fresh granite.
With that, you should be fine! If your granite countertop installation didn’t go as planned for any reason whatsoever, please contact your fabricator for assistance. Installing countertops for yourself is not impossible, but it’s a tiresome job that requires patience and knowledge. For that reason alone, we always recommend you get a capable team that will take care of every step of the way at the blink of an eye.
Get the help of experts from Eagle Stones today!
Serving the city of Sarasota, our team provides clients with worldwide supply and exclusive installation services. In case you need to get a brand new granite countertop or have a general home renewal, don’t hesitate to contact us. Installing your own countertop can be a tricky process – and you don’t need to worry about the specifics with Eagle Stones. Click here to see our online catalog!
Did you know that we also sell pavers for your private and public projects? Get in touch with Eagle Pavers to get started right away with a free estimate.